what kind of paint yo use to paint outside
Exterior Painting Tips and Techniques
Updated: Mar. 31, 2021
Paint faster and amend using these brushing, rolling and cutting-in techniques
A practiced exterior painting job will extend the life of your siding and trim and increase the value of your house. Learn the best techniques for applying paint apace and thoroughly.
Yous might also like: TBD
- Time
- Complication
- Cost
- Multiple Days
- Intermediate
- $501-thou
Exterior House Paint Overview
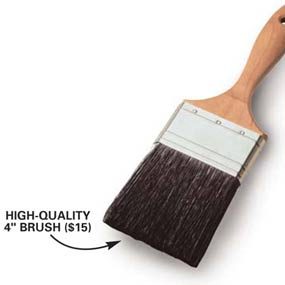
Top-quality brush
Investing in skilful equipment pays off in faster, better quality work.
Painting the exterior of your business firm is a huge job. Simply the rewards are great too. With a minimum investment in tools and materials, you'll save thousands of dollars, extend the life of your siding and trim and increase the value of your home. Best of all, y'all'll make it look like new over again.
While you lot may spend a substantial amount on tools and paint, the same job washed by a pro could easily price many times more. The savings come at a toll, though. A good paint job requires endless hours of careful outside pigment preparation. Plan to devote an entire summertime to ready and pigment even a medium-size business firm.
In this article, we'll evidence you how to utilise the final coats of paint (we used acrylic latex) for a durable, professional-looking end. Grooming is a separate topic covered in other articles.
Completing a top-quality outside paint job requires more patience and perseverance. You lot'll need a abrupt eye, a steady manus and a bit of practice to paint crisp, directly lines. In addition, you'll need the strength to move and prepare tall ladders, and the conviction to work from them once they're in identify.
Key Exterior House Painting Techniques
If you can master these three exterior house painting techniques, you tin do a pro-quality painting job.
Buy high-quality painting tools
Applying topcoats (the final coats of pigment) doesn't crave much equipment across what you've already accumulated for scraping and priming. We recommend buying at least ii top-quality constructed-bristle brushes for applying the latex pigment: ane 4-in. straight-bristled brush for large areas and a i-1/2-in. angled sash brush for detail work.
For applying paint to large areas of shingles, stucco or brick, buy a roller setup consisting of a heavy-duty roller cage (this is the handle part); elevation-quality i/2-in. nap roller covers, one for each color (you'll wash and reuse them); and a roller screen (Photo 4). Standard 9-in. rollers are good for large, flat areas. Buy the 7-in. size for rolling siding and other narrow areas if your house has them. You'll too need a few make clean i-gallon paint cans and a clean 5-gallon bucket. Having a boom box on hand could just save your mind while painting a house.
3-step brush technique

Photograph 1: Load the brush
Load the castor past dipping about ii in. of the bristles into the pigment. Slap the brush dorsum and forth in one case against the sides of the tin can to remove backlog paint. Paint from a bucket with ii or 3 in. of pigment in the bottom rather than a full tin of paint.

Photo 2: Spread the paint
Lay on the paint thickly with ii or three dorsum-and-forth strokes. Don't worry virtually smoothing it nonetheless. Then reload the brush and repeat until you've covered well-nigh 3 or four sq. ft.

Photo iii: Shine the pigment
Smooth the paint without reloading the brush. Use long, sweeping brush strokes, working from the unpainted area toward the painted surface area. Elevator the brush while it'south still moving at the end of each stroke.
Paint stores tin aid with colors and quantities
Choosing exterior pigment colors that complement the architectural details of your house and fit the character of your neighborhood is the first step to a great paint task. Check out bookstores and libraries for books on the subject. Y'all'll find brochures at the pigment store with collections of historic colors. Many paint stores take designers on staff who tin can assistance you choose colors, or you lot could hire a designer or architect. Let them know if you lot're painting wood siding or something else.
Buy a quart of each color you've chosen and paint the entire color scheme on a pocket-size area of your house before committing to gallons. If you don't similar the results, change the colors and try once again.
Next take rough measurements of your firm, noting the blazon of surface, for example, stucco, cedar shingles or smooth siding. Count the doors and windows. With this information, paint store employees tin can help you calculate the amount of paint y'all'll demand. Program on applying two coats of acrylic latex paint over the primer.
Buy the all-time paint you can afford. Good-quality paint is easier to apply, covers better and lasts longer. We recommend buying pigment with a slight sheen, either satin or eggshell. It'south more fade resistant and easier to clean than flat pigment.
Roller technique

Photograph iv: Load the roller
Cascade near a gallon of paint into a clean 5-gallon bucket and hang a roller screen into the bucket. Load the roller, rolling it against the screen until the roller nap is saturated and the excess paint is squeezed out.
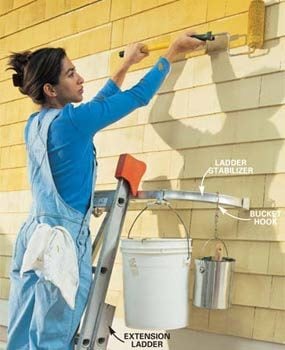
Photo 5: Roll the paint
Lay on the pigment with the roller. Use moderate pressure and reload the roller when paint no longer flows off easily. Again cover almost 3 or 4 sq. ft. Rolling causes paint to spatter, and then be sure to protect patios, walks and landscaping with dropcloths or plastic.
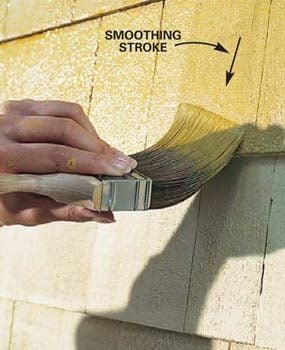
Photo six: Piece of work the paint in with a brush
Dorsum-brush by working the paint into cracks and onto the bottom edge of shingles and siding with your paintbrush. Then brush with the grain of the wood to polish the paint.
Check the weather
- Avoid painting in direct sunlight. The heat dries the paint too fast, making it most incommunicable to avoid lap marks. It tin can even crusade blistering and peeling.
- Avert painting on very windy days. The air current causes the pigment to dry besides fast and tin can blow dirt into wet paint.
- Don't apply latex pigment when the temperature is below 50 degrees F unless it's formulated for cold weather application. Read the label to be certain.
- Don't paint when at that place's a chance of pelting.
Avoid These Common Problems
Lap marks show up as darker areas and are acquired by painting over stale paint—in essence, adding another coat. To avert lap marks, work quickly and paint in sections small enough so the previously painted area stays moisture until you can brush the newly applied paint into information technology. If you lot do end up with lap marks in the first coat, the second coat will probably cover them.
Brush marks left at the showtime and stop of a brush stroke are a common problem that'due south easy to avoid. Showtime every castor stroke in an unfinished area, at an edge, or against door or window trim. Then castor toward the finished area and sweep the castor upward and off the work in the same movement. If you stop the castor and then elevator it off or set the brush down on a finished surface area to kickoff the stroke, it volition leave actress pigment, which shows up as a brush mark or darker spot.
Drips, runs and sags are best avoided by constant vigilance. Check dorsum on your work as you go, paying special attention to within corners and edges where paint is likely to build up and run. If the paint hasn't begun to dry, brush out the run. Otherwise, permit the run to dry completely. So sand information technology off with 100-grit paper and touch upwardly the spot with fresh paint.
Cutting-in Exterior House Painting Techniques

Photograph seven: Cut in at the corner
Load the brush and wiggle the tip of the brush carefully into the inside corner. Then pull information technology out and along one edge for about 4 in.
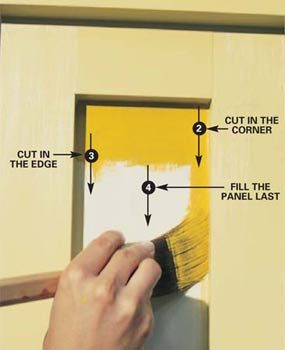
Photo eight: Paint the side by side edge
Plough the brush to pigment the adjacent border of the same inside corner and repeat the procedure. Reload the brush and remove excess paint from the bristles by laying on the paint shut to, but not confronting, the edge y'all're cutting in. Without reloading the brush, go dorsum and paint shut to the edge. Fan the beard slightly and apply a tedious, steady stroke while concentrating on the line you're painting. Complete the exterior house painting job by smoothing the pigment in the heart of the panel with long, sweeping strokes, keeping well away from the completed border.
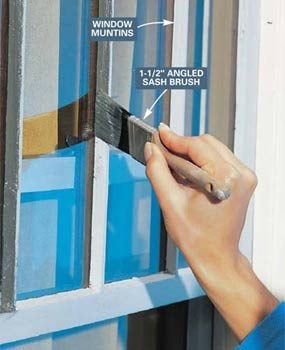
Photo ix: Paint onto the drinking glass
Lap paint slightly onto the drinking glass equally you paint window muntins and sash. Utilise a 1-1/2 in. angled sash brush. Wipe off most of the paint on the edge of the tin can for improve command. Later the paint dries, scrape the excess from the glass with a single-edged razor bract.
Plan a strategy for the nearly efficiency
In general, work from the top down. Paint big areas first and details terminal. Where two colors encounter, allow time for the first colour to dry out before returning to utilise the second color. For example, paint the window sash (the movable function) early in the day and return to paint the frame effectually the sash.
Pigment like a pro with these techniques
You tin improve your painting skills past understanding the strategy pros use. They break down the painting process into two steps.
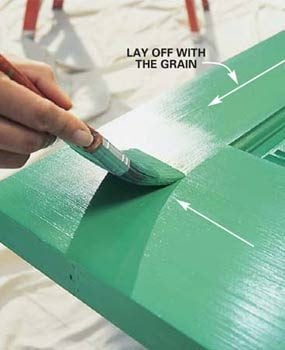
The goal of the first stride, chosen "laying on" the paint, is to get the pigment onto the surface in the quickest, near efficient way possible. Don't worry almost smoothing it out yet (Photo 2). Employ a castor, roller or sprayer for this step and apply enough paint to cover the surface without creating runs. Encompass an expanse just large enough to allow yous to become dorsum and smoothen it before the paint starts to dry. Since heat, humidity and the type of pigment you're using all influence drying time, you'll have to experiment as you showtime to pigment to get a feel for how large an surface area you tin safely encompass before returning to smooth it out. The most common error starting time painters make is spending also much time and try laying on the paint. A few quick strokes is all that'south needed. Then reload the castor and embrace the adjacent area.
Once yous've got a pocket-size area covered, you lot're ready for step two, laying off the pigment (Photograph 3). First use your brush to spread the paint evenly over the surface and so finish up with long, continuous castor strokes. The goal is to completely cover (but not necessarily hide) the previous layer of paint or primer with a smooth, even layer of pigment. This step must be washed immediately after the paint is laid on and before the paint starts to dry.
You may exist wondering how to tell if yous're applying enough paint. Unfortunately, there's no exact formula. In general, you'll have better success applying two thin coats than struggling to comprehend the primer with 1 thick glaze of paint. Thin coats dry more thoroughly and don't crusade bug like runs, sags and paint buildup that are associated with heavy layers of paint. Your goal is to get plenty paint on the surface to permit the brush to glide smoothly, just not exit and so much that it forms runs or sags.
Door-painting technique

Photo 10: Paint door panels get-go
Spread paint on the panels starting time, working it into the corners. Smooth the paint with long strokes in the direction of the wood grain.
Photograph 11: Spread paint, then polish it
Spread a layer of paint on the door parts surrounding the panels. Piece of work quickly from i terminate of the door to the other so y'all're always brushing dorsum over moisture paint. Spread paint on about one-third of the door before smoothing it out with long, sweeping brush strokes. Then move to the next 3rd and brush back toward the finished section. Plan the order to follow the woods grain (see numbers on Photo x). Don't forget to paint the height and bottom edges of the door to seal out moisture.
Pigment into a wet edge
Maintaining a wet edge is 1 of the most important techniques in painting (Photograph 3). Simply put, ever endeavour to brush or roll dorsum into paint that'due south notwithstanding wet. The result volition be a uniform, seamless-looking coat of paint. The larger the area you're painting, the more hard this chore becomes. Use natural breaks like door and window casings or courses of siding to carve up large areas into manageable chunks. So consummate each section without stopping. Paint three or four courses of siding from one stop to the other, for example. So move down to the next four courses and repeat the process.
Timesaving tips
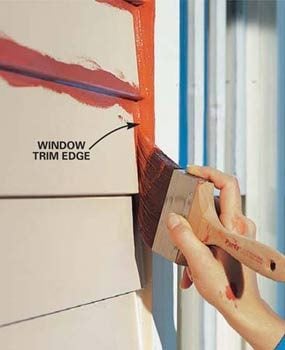
Photograph 12: Employ the siding color on casing edges
Paint the edges of window and door casings the same color as the siding paint. It looks great from the street and will save you tons of time.

Photograph 13: Wipe mistakes while they're wet
Wipe excess paint from the face of the window trim with a rag before it dries. Utilise this same tip anywhere backlog paint builds upwardly along an border.

Photo 14: Tape off bottom edges
Employ a putty pocketknife to press masking tape into lower corners that are likely to take hold of runs. Then slide a putty knife along the edge of the tape while maintaining firm downward pressure to ensure a skillful seal and forestall pigment from leaking under the tape.
- Hold the paint can close to the surface you're painting to reduce arm movement and minimize dripping (Photo 2).
- Learn to pigment with either hand, specially when you lot're working from a ladder. It doubles your reach.
- Paint doors and windows early in the mean solar day so y'all tin shut them at night.
- When you're done painting, write the date, location and formula or proper name of each paint color on the lid. And so store the paint where it won't freeze.
Cut in takes practice

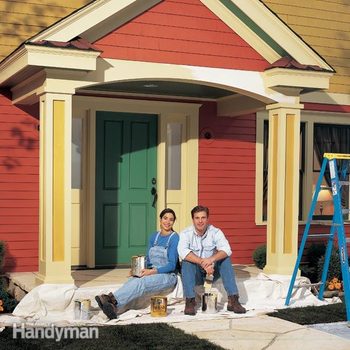
Finished painting project
Attention to details pays off in an bonny painting job that will last for years.
Painting a directly line, also called cutting in a line, is another painting technique worth mastering (Photos 7 – 9). Begin by removing excess pigment from the brush either past laying it off onto the piece yous're painting or by wiping it on the edge of the can. And so, property the brush like a pencil with the beard edgewise (Photo 8), draw downwards along the line. If likewise much paint begins to build up under the bristles, threatening to spill across the line, sweep the castor abroad from the line. Then go back up to the acme of the stroke and depict down once again, moving the paint closer to the line. Continue this process until you've cut in the entire line.
If you've taken the time to properly clean and prepare the surfaces and take carefully primed, caulked and painted using superlative-quality materials, your paint chore should final at least x years. According to painting pros we talked to, annual maintenance is the best manner to extend the life of your paint task and protect the structure. Inspect your business firm every year. Use binoculars if you have to. Then scrape, sand, prime, caulk and touch up any areas where paint is peeling or cracking. The new pigment may not match exactly, but at least you'll prevent further damage and push off that major pigment chore several actress years.
Required Tools for this Exterior House Painting Project
Take the necessary tools for this DIY projection lined up earlier y'all start—you'll salve time and frustration.
Painter'due south tape
You should also take a roller screen and a ladder stabilizer.
Required Materials for this Exterior Painting Project
Avert last-minute shopping trips by having all your materials ready ahead of time. Here's a list.
Originally Published: November fourteen, 2019
sorrellspoetastords.blogspot.com
Source: https://www.familyhandyman.com/project/exterior-painting-tips-and-techniques/
0 Response to "what kind of paint yo use to paint outside"
Postar um comentário